To Gain Knowledge and to become a one, who all wants to become

Dreams are not those which are seen during sleep ,but Dreams are those which do not let you sleep,so see the dreams
and work hard to make them true.

Monday, April 11, 2016

Configuring IP Alias on existing network card on OpenSuse

The Suse configuration is bit different than other Linux flavours . Instead of creating additional interface configuration files for alias IP’s like the ifcfg-ethX:X type files, you simply append new entry with the new IP address.  Here is what  ifcfg-eth1 looks like on this system with the existing NIC and IP.

1. Be root user to perform this activity .
2. Change your current directory to the /etc/sysconfig/network directory with the command:
cd /etc/sysconfig/network
 3. Check for existing network adapters with the command :
ls ifcfg-eth*
and look for a file named similar to ifcfg-eth-id-00:50:56:b8:7d:64 The colon-delimited letters & digits at the end are  MAC address of network adapter.

4. To create the new interface, you will edit ifcfg-eth-id-00:50:56:b8:7d:64. The file should contain lines similar to:


BOOTPROTO='static'
BROADCAST='192.168.11.255'
IPADDR='192.168.11.41'
MTU=''
NETMASK='255.255.252.0'
NETWORK='192.168.11.0'
REMOTE_IPADDR=''
STARTMODE='onboot'
UNIQUE='B35A.weGuQ9ywYPF'
_nm_name='bus-pci-0000:02:00.0'

5. To add additional IP address on this machine ,you need to append a new configuration block using the same label. Add a new block and name it BB and same way you can create multiple blogs for adding multiple IP addresses ............

IPADDR_BB=’x.x.x.x′
NETMASK_SN=’xxx.xxx.xxx.x′

6. After adding new address, save the file and restart network services to activate the new IP address.
/etc/init.d/network restart

Monday, December 31, 2012

Getting your Gmail Emails (using pop/imap) in linux box using fetchmail :

1. Get the SSL Certificate for connecting to Gmail POP3-over-SSL (pop3s) :

    # cd /usr/share/ssl/certs
    # chmod 644 Equifax_Secure_Certificate_Authority.pem
    # openssl x509 -in Equifax_Secure_Certificate_Authority.pem -fingerprint -subject -issuer -serial -hash -noout
    # c_rehash . (c_rehash command will be available with openssl-perl package)
    # file 594f1775.* (the name of linked file)


2. Create a .fetchmailrc file in user's home directory and write the following lines :

    poll pop.gmail.com with proto POP3
    user 'username@gmail.com' there with password 'password' is username here
    options keep ssl sslfingerprint 'FF:69:18:0D:75:8C:17:61:F5:EF:FC:F9:85:7D:F5:0E' (this fingerprint will be shown by using fetchmail -v)
    sslcertpath /usr/share/ssl/certs

3. fetchmail -d 600 (The fetchmail utility can be run in daemon mode by running it with the -d flag, followed by the interval in seconds that fetchmail should 
    poll servers listed in the .fetchmailrc file.)

4. You can now check your gmail emails in local users mailbox by using mail user agents like mail,mutt,alpine,etc.

Tuesday, September 11, 2012

NGNIX on Cpanel

Install Nginx on cPanel

The bright people over at http://www.nginxcp.com have come up with a wonderful little tool for working with Nginx. It integrates a admin panel into WHM so you can stop and restart Nginx, recreate the vhost config, view the Nginx Logs and check apache.

Also it autoconfigures WHM and Apache for use with Nginx by changing apache from listening on port 80 to port 8081.

For those who don't know what Nginx is its a caching proxy that will cache static content such as images and html files and serves them up without having to access Apache for the content thus improving speed, memory usage and processor overhead. All dynamic content such as php, java and video are proxied to Apache for processing.

So if you have a site that is slow you might benefit from Nginx serving up all the static content and only using Apache to process the php files..

Nginx Admin (Stable version) v3.2 for Cpanel Version 11.30 or above

Install Instructions:


#cd /usr/local/src
#wget http://nginxcp.com/latest/nginxadmin.tar
#tar xf nginxadmin.tar
#cd publicnginx
#./nginxinstaller install

If you receive any pyaml related error or the following error :

—————————–
Welcome to the Nginx Admin installer……Starting Install
Generating vhosts…
Traceback (most recent call last):
File "/scripts/createvhosts.py", line 2, in ?
import yaml
File "/usr/lib/python2.4/site-packages/PyYAML-3.10-py2.4-linux-i686.egg/yaml/__init__.py", line 26
SyntaxError: 'yield' not allowed in a 'try' block with a 'finally' clause
Installing WHM interface…
deploying booster rockets
Traceback (most recent call last):
File "/usr/local/src/publicnginx/nginxinstaller2″, line 9, in ?
import createvhosts
File "/usr/local/src/publicnginx/createvhosts.py", line 2, in ?
import yaml
File "/usr/lib/python2.4/site-packages/PyYAML-3.10-py2.4-linux-i686.egg/yaml/__init__.py", line 26
SyntaxError: 'yield' not allowed in a 'try' block with a 'finally' clause
——————————

Then run execute following commands ….
For i686 architecture :-

# easy_install Pyyaml==3.09
# rm -f /usr/lib/python2.4/site-packages/PyYAML-3.10-py2.4-linux-i686.egg

For x86_64 architecture :-

# easy_install Pyyaml==3.09
# rm -f /usr/lib/python2.4/site-packages/PyYAML-3.10-py2.4-linux-x86_64.egg

Then Again run the following commands :-

# ./nginxinstaller install
# /etc/init.d/httpd restart

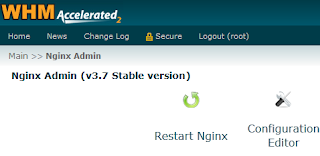
Now Nginx run on the port no:80 and apache run on the port no.8081.You can manage the nginx through WHM >> Main >> Nginx Admin


To uninstall nginx use following :-

#  cd /usr/local/src
#  wget http://nginxcp.com/nginxadmin2.8-stable.tar
#  tar xf nginxadmin2.8-stable.tar
#  cd publicnginx
#  ./nginxinstaller uninstall